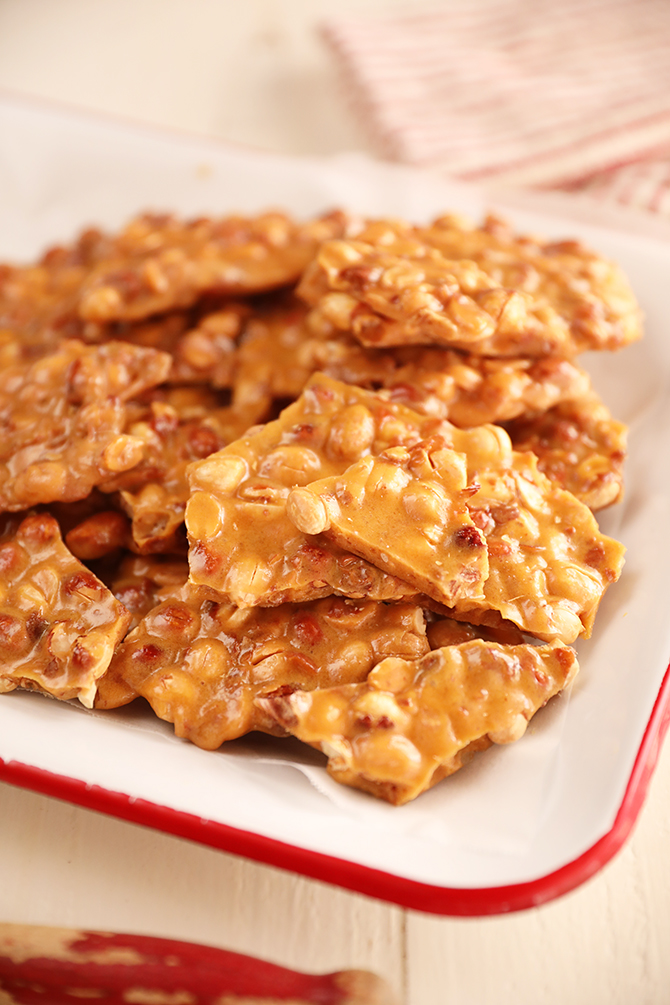
Easy Microwave Peanut Brittle: Homemade Perfection in Minutes
For many, the mention of homemade peanut brittle conjures images of a bustling holiday kitchen, a giant pot simmering on the stovetop, and the meticulous dance of stirring, watching, and waiting. It's a cherished tradition, a brittle, buttery testament to festive spirit. But what if we told you that the secret to perfectly crunchy, melt-in-your-mouth peanut brittle could be unlocked with the press of a button, in a fraction of the time, and with none of the fuss? Enter the miraculous world of
microwave peanut brittle – a game-changer that promises homemade perfection in mere minutes.
Like many culinary traditionalists, I approached the idea of "microwave peanut brittle" with a healthy dose of skepticism, if not outright disdain. How could a beloved, complex candy, usually demanding specific temperatures and careful attention, possibly translate to the simplicity of a microwave? Yet, after countless recommendations from friends and readers alike, curiosity (and a secret desire for an easier life) won out. And y'all, I'm so glad it did. This method doesn't just cut down on cooking time; it delivers a brittle that is indistinguishable from its stovetop counterpart – perfectly crisp, delightfully nutty, and utterly delicious. It's a secret weapon for busy holidays, impromptu cravings, or simply impressing guests with your newfound candy-making prowess.
The Sweet Revolution: Why Microwave Peanut Brittle Changes Everything
For generations, family recipes, often handwritten and passed down, dictated the ritual of brittle making. Our family’s version, from my mother’s great aunt Matilda, was legendary – always perfect, but always a labor of love, requiring meticulous timing and often an extra set of hands to manage the molten sugar. It was a beautiful process, but undeniably time-consuming and somewhat intimidating for the novice candy maker.
The microwave method shatters these preconceived notions, transforming a perceived culinary challenge into an accessible delight. Here's why this sweet revolution is here to stay:
*
Unbeatable Speed: We're talking about shaving off significant time, often achieving a perfectly cooked batch in less than 10 minutes of active cooking. This speed means more batches, more quickly, making it ideal for holiday gifting or large gatherings.
*
Simplified Process: Gone are the days of constant stirring over a hot stove. The microwave handles the initial heating with remarkable efficiency, freeing you up for other tasks (or just enjoying the aroma!).
*
Consistent Results: With the right tools and a little understanding, the microwave offers a controlled environment that can lead to incredibly consistent batches, every single time.
*
Identical Taste and Texture: This is perhaps the biggest revelation. Despite the unconventional cooking method, the end product boasts the exact same crisp, golden, nutty perfection that defines classic peanut brittle. Seriously, don't tell Grandma; she'll never guess!
This newfound ease means that what was once an annual holiday splurge can now be a delightful treat any time the craving strikes. It's an invitation to embrace candy making without the apprehension, offering a delicious reward for minimal effort.
Mastering the Crunch: Essential Tools & Techniques for Success
While the microwave method significantly simplifies the process, achieving that perfect, shatteringly crisp brittle still requires adherence to a few key principles and the right equipment. Think of these as your non-negotiables for brittle brilliance.
The Unsung Hero: Your Thermometer
This is perhaps the most crucial piece of advice for any candy making, and particularly for
microwave peanut brittle. While some adventurous souls might attempt it "living on the edge," a reliable thermometer is the ultimate safeguard against sticky, chewy disappointment or burnt, bitter batches.
You don't necessarily need a bulky, traditional candy thermometer, though it works perfectly well. An instant-read thermometer that can register high temperatures (up to 400°F or 200°C) is often more convenient and equally effective. This versatile tool is a kitchen drawer essential anyway, useful for everything from roasting meats to checking bread. The goal is to reach the "hard crack" stage, which typically falls between 300°F and 310°F (149°C-154°C). This precise temperature ensures the sugar mixture loses enough moisture and undergoes the necessary chemical changes to achieve its signature crisp, brittle texture. Anything below this range will result in a soft, chewy, caramel-like candy that, while tasty, isn't brittle. Over-cooking, on the other hand, risks burning the sugar, leading to a bitter taste.
Battling the Elements: Humidity's Role
Humidity is the silent saboteur of perfectly crisp brittle. Sugar is hygroscopic, meaning it readily absorbs moisture from the air. On rainy or particularly humid days, this extra moisture can infiltrate your candy, making it sticky and chewy instead of gloriously brittle.
A few degrees above the recommended temperature (e.g., aiming for 305°F-310°F) can help counteract the effects of humidity by driving off more moisture during cooking. After your brittle has cooled and hardened, proper storage becomes paramount. Always keep your
microwave peanut brittle in an airtight container at room temperature. Refrigeration or freezing can introduce more moisture and should be avoided for long-term crispness.
Power Play: Microwave Wattage Matters
Just like ovens, microwaves vary significantly in their power output, measured in watts. A recipe developed in a 1650-watt microwave will yield different cooking times than one made in a 900-watt machine. This variance is particularly noticeable during the final cooking stages, after the peanuts and butter have been added.
This is precisely why your thermometer is indispensable. While a recipe might provide approximate cooking times, your specific microwave will dictate the actual duration. Rely on the thermometer to tell you when the mixture has reached the hard crack stage (300-310°F), not just the timer. This adaptability ensures success regardless of your appliance.
Prep for Perfection: Safety and Setup for Your Microwave Brittle Journey
While the microwave streamlines the cooking, making candy still involves handling extremely hot sugar. Preparation and safety are key to a smooth, enjoyable, and burn-free experience.
Gather Your Arsenal: Ingredients & Mise en Place
The beauty of
microwave peanut brittle lies in its simplicity. You'll typically need just a handful of common pantry staples: white sugar, light corn syrup (which helps prevent crystallization), peanuts (roasted and unsalted are often preferred for controlled flavor), butter, baking soda (to create those tiny air bubbles for a delicate crunch), and vanilla extract for an aromatic finish.
The concept of *mise en place* – having all your ingredients measured, chopped, and ready before you start – is crucial here. Once the sugar mixture reaches temperature, things move very quickly. You won't have time to measure out baking soda or unwrap butter. Have everything laid out, along with your prepared baking sheet (greased or lined with a silicone mat) and spreading tools.
Safety First: Handling Hot Sugar
Molten sugar isn't just hot; it's *dangerously* hot, capable of causing severe burns. Always exercise extreme caution:
*
Use a Microwave-Safe Bowl: Ensure your bowl is large enough to accommodate the mixture as it bubbles and expands. Glass or ceramic bowls designed for microwave use are ideal.
*
Oven Mitts are Your Friends: Always use thick oven mitts when handling the hot bowl, especially when stirring or removing it from the microwave.
*
Careful Pouring: When it's time to pour the molten brittle onto your prepared surface, do so slowly and deliberately. If you have a second set of hands available, now is the time to enlist them!
*
Keep Clear: Keep children and pets away from the cooking area when making candy.
*
Resist Temptation: Do not taste the hot sugar mixture directly.
With these precautions in mind, you can confidently embark on your brittle-making adventure.
Beyond the Basics: Elevating Your Microwave Brittle Experience
Once you've mastered the foundational recipe for
Master Microwave Peanut Brittle: Pro Tips for Perfect Crunch, you might find yourself inspired to experiment and personalize your batches. The versatility of this simple candy allows for delightful variations.
Consider swapping out peanuts for other nuts like pecans, cashews, or even a mix of your favorites. A pinch of sea salt sprinkled over the cooling brittle can enhance the sweetness and add a sophisticated edge. For a festive twist, a touch of cinnamon or a different extract, like almond or maple, can introduce new flavor dimensions. Some even like to add a sprinkle of mini chocolate chips just as the brittle is spread, allowing them to slightly melt into the warm candy.
Microwave peanut brittle also makes an exceptional homemade gift. Its impressive appearance belies its effortless preparation, making you look like a culinary wizard with minimal effort. Wrap individual pieces in cellophane bags tied with a festive ribbon, or arrange an assortment in decorative tins. For more ideas and inspiration on crafting the perfect edible presents, check out our guide on
Gift-Worthy Microwave Peanut Brittle: Your Quick Holiday Secret.
Remember the lighthearted warning: this brittle is so delicious, you might find it hard to stop eating! Consider making smaller batches, or plan to share it generously with friends, family, and neighbors. Stored correctly in an airtight container on the counter, your brittle will remain perfectly crisp for weeks, though its irresistible nature means it rarely lasts that long!
In conclusion, the world of candy making has been wonderfully democratized by the simple power of the microwave. The ease, speed, and consistent deliciousness of
microwave peanut brittle make it an essential recipe for anyone craving a taste of homemade perfection without the traditional fuss. So, shed your skepticism, grab your thermometer, and get ready to create brittle that will delight your taste buds and impress everyone you share it with – all in just minutes.